How to Move IMAP Folders in Office 365?
You can easily move emails from IMAP enabled email servers to Office 365 using the internet message access protocol. But before starting, you need to know some of the limitation associated with this process.
- User can move only inbox items or other email folders to Office 365 account. It is not capable of moving contacts, calendar and tasks.
- A maximum of 5, 00,000 items can be transferred to Office 365 account. User cannot move more than the prescribed limit from a user’s mailbox.
- There is a size limit of 35MB for an email.
Note: make sure that you have added the users to your Office 365 admin account, before starting the migration.
Follow these steps to move IMAP folders in Office 365 account
Step 1: Go to Office365.com and fill your login credential of admin account.

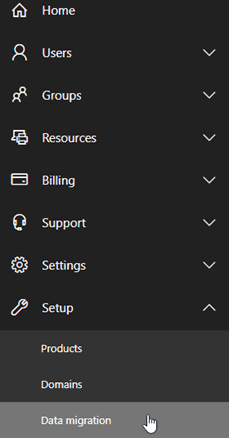
Step 2: Now move your curser to the menu bar and click on Setup then a drop down menu opens, choose Data migration.

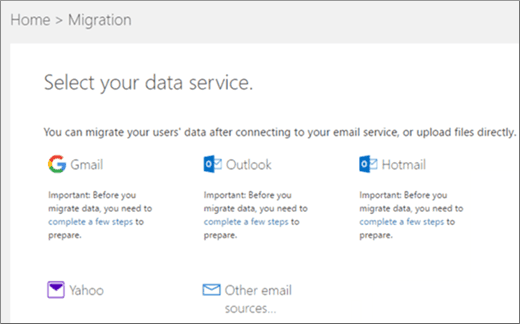
Step 3: After clicking Data migration, a new wizard opens with a list of different Email providers. If your email provider is listed in it, select it.

Step 4: Now it will ask you to select users which you want to move in Office 365 account. Select the required user account and fill login credential of each user account separately.
Step 5: After filling all the required information, click on “Start Migration” which is available at the left corner of the display.

Step 6: Just after clicking on start migration button, it will show any of these status: Starting – Queued – Syncing – Synced. To finish the process, click on “Stop Migration” when the status comes to Synced. Once the conversion is completed click on “Close Connection”.
How to Move IMAP Folders if your Email Provider is not Listed?
It is quite easy to move IMAP email folders to Office 365 account if your service provider is listed. But it become little bit complex if your service provider is not given in the list of “Select your data service”.
- Click on other email source from Select your data service dashboard.
- Now fill your IMAP Server details such as IMAP server name, port no, email address and password then click on Save button.
- Once the connection is setup, it will display all the mailboxes associated with the email address.
- Now follow the above given steps from 4 to 6 to move IMAP folders in Office 365.
IMAP to Office 365 Tool – A Professional Solution
As you can easily see, transferring IMAP emails to Office 365 with Admin Center is not an easy option. Also it is required to have proper expertise in technical field. So you should use a third party tool that gives you complete solution of how to move IMAP folders in Office 365. It has some advance feature which makes the conversion process so effortless and efficient.
- Bulk migration of IMAP email folders to Office 365 in just one time processing.
- Compatible to almost all IMAP supported Servers.
- Allow movement of archive folder as well as public folders.
- Support migration in all Windows version such as 10, 8, 7, 8.1, vista etc.
- Offer advance filtering option to move IMAP mail folder to Office 365 account.
- Provide backup summary in CSV format which can be saved for future use.
- Capable of migrating all type of attachments associated with emails.
- Maintains folder structure and folder hierarchy.
- Preserve all the email attributes i.e. Header, Meta formatting, font style etc.
Conclusion
After reading this blog we hope all your doubts related to conversion of IMAP folders into Office 365 get cleared. You will get an idea why it is not easy to move IMAP folders in Office 365 manually. So we provide an alternative solution i.e. IMAP to Office 365 Tool, a perfect Email Backup Tool to makes the conversion process so effortless. You can download the software by below given link. IMAP Backup Tool demo version is also available for user convenience. It facilitate user to move first 20 IMAP emails to Office 365 for free of cost.
